Pendant made using mokume gane technique. Photo: peggierobinsondesigns.com Mokume Gane is a Japanese metalworking technique. If we try to translate its name literally, we get the following set of words: “mo” - wood, “kume” - texture, “gane” - metal. Its essence lies in obtaining a composite product consisting of several different metals, which form a decorative pattern on its surface, reminiscent of wood in texture.
Advertising - Continued below
History of the birth of technology
The mokume gane technique appeared at the end of the 17th century thanks to the samurai sword maker Denbei Shaomi. It is believed that the idea of connecting dissimilar metals together is the result of an eastern economical approach to production. Due to the shortage of precious metals, they tried to find a worthy replacement that would not detract from the nobility of the samurai sword.
One way or another, Shaomi passed on the developed technology to numerous students who continuously supplemented and improved it. Over time, Mokume began to be used not only for decorating weapons, but also in the manufacture of household items: vases, dishes, jewelry.
Earrings made of polymer clay. Materials and tools
To create earrings we will need:
- Polymer clay white, red, yellow, green, purple, pink;
- Blade or stationery knife, curly (wavy) blade;
- Cutters of any shape, but of the smallest size;
- Rolling pin or pasta machine;
- A cutter in the shape of a square with a diameter of 4 cm;
- Earrings and connecting rings;
- Stack with a needle or toothpick;
- Varnish for polymer clay.
Modern tendencies
For more than two centuries, the mokume gane technique remained unknown outside Japan. Only at the end of the 19th century did unusual products begin to be exported to European countries. It took Western craftsmen a lot of time and effort to unravel the mystery of eastern metal wood. Due to the complexity of technology, high-quality products are still very rare today. Despite modern achievements in jewelry production and the availability of technological equipment, there are hardly a hundred truly qualified craftsmen working in this direction in the world.
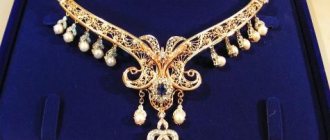
Rings made using the mokume gane technique. Photo: christophersfjd.com
Today, jewelry made using the mokume gane technique is considered exclusive jewelry and has an appropriate price. In addition to the uniqueness of each item and the labor-intensive process of its production, an additional factor increasing the cost is the large amount of irrecoverable waste, since the precious metals used after diffuse welding cannot be further processed.
A Complete Guide on How to Make Mokume Gane
16 August 2021, 15:22
In the process of learning the Mokume Gane technique, I read several textbooks on this topic. And I discovered that every manual, every textbook provides only a description of some (not completely) elements of this subtype of jewelry art. And I decided to write my guide, in the hope of adding my ideas and developments to this industry, and sharing knowledge with you.
Two months of research and practice, and you will already be able to do the same mokume gane.
A stunning pair of engagement rings for my friends. These are brass-copper samples that we made to understand what the process of creating rings in the mokume gane style looks like and happens.
I had a lot of frustrating moments and downright problems at various stages of making these rings. This took a lot of time and effort, a considerable number of people were interviewed, much more knowledgeable than me, who gave a lot of different advice, and I put all of them together like a puzzle separately into a single picture to understand the essence of the process. I think the important difference between this mokume tutorial and the ones that already exist is that I'm not an expert, but I was still able to understand the process and succeed.
As a starting point, I used Ian Ferguson's book Mokume Gane, which is included in the jewelry reference list. The author takes a deep look at some areas in Mokum, but does not cover everything at once.
At the moment, I cannot tell you which directions, since I myself am still completely immersed in the processes of research and study, and spend a fair amount of time learning the process. The author has the advantage of $150,000 worth of equipment purchased by Oxford College for the experiments: atmosphere control apparatus, super alloys with memory effect, and a bunch of other amazing consumables that you probably can’t buy at the nearest store behind your house.
I also gained some knowledge from James Binion's tutorial on Art Metal. James himself is very specific in some aspects, but, like many authors of this or that technique, is rather weak in others.
I would not like to talk now about any specific step, about any technical operation, whether important or not very important. And this is only because the Mokume technique is actually a very precise and scientific area of jewelry craft, in which there are so many variables that any uncertain step in the process of work, any action, not being perfect, honed, can lead to the whole your workpiece to destruction and delamination.
The goal of this tutorial is to improve your mokume making process so well that you can, in a controlled manner, make changes at one stage of the process without interfering with or damaging the product at other stages.
Fragments of my rotating plate after initial welding, with the press hanging over the “product”.
It can take some time before you learn how to make mokume - I needed to make (and even ruin) almost twenty blanks before I felt like I could do exactly one or more steps of making the product without ruining the product itself, which approximately can be compared with 25% of 100% of possible final success, but at the same time, the level of knowledge and experience is constantly increasing.
I used the spinning plate method using a hydraulic press and an electric oven. This is an intermediate stage between the traditional "bonding" method using the "charcoal method" that the Japanese use, and Ian Ferguson's insulating thermoplastic material press in a kiln with the ability to control the temperature and heating of the environment (to determine the state of the working environment inside the kiln). You can find the specification for such a plate yourself in James Binion's manual.
So, until now, you have been patiently waiting for the specifics and especially the process of creating Mokume, my developments, well, here they are:
A set of tools and materials, including milk magnesia on the left and a grinding unit on the right
Required ingredients:
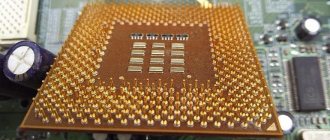
- sheet metal cut to size - in my case, this means 8 pieces of silver or copper, and 9 pieces of copper or brass, depending on the process. I cut out 16 identical pieces. We use hydraulic shears, but you can do them by hand - just trim the edges of the pieces (the ones you cut from the sheet metal).
- sanding block
- sanding jig - a piece of plywood with nails driven into just below the thickness of the metal to hold it in place during the sanding process.
- sanding material - I used a 3M brush - hard synthetic steel wool. Others recommend 220 sandpaper.
- sanding tray
- latex gloves
- distilled water
- alcohol
- lint-free cloth or paper towel
- diluted fluorine and silver - containing soldering flux (I'll explain below)
- rotating plate
- 4 nuts, bolts, washers
- Milk of magnesia (holiday reagent)
- electric oven with a heating temperature range up to at least 760 C
- press or vice
- spanners
- 2kg hammer
- rolling device
- appropriate tongs to hold the workpiece.
- disposable antistatic brushes for applying acid, lye
The process of creating mokume gane:
Before you start:
- Make sure your rotating plate is ready to go. You don’t want to have to deal with cleaning the plate and the area around it after work. Make sure every bolt and plate surface is coated with milk of magnesia as a "tempering" agent. Remember that you are trying to create ideal conditions for the metal to bond to other metals - and you certainly don't want this situation to happen to the bolts on the plate.
- Milk of magnesia is magnesium oxide in the form of a suspension. Ian Ferguson recommends using a fluid like white titanium oxide, but I find it gets sticky when it dries and then the nuts are difficult to tighten when you want to get the whole spinning plate together for mounting.
- Preheat oven to 760ºC (copper-brass and copper-silver combinations only! I have not worked with others. Remember, the silver-brass alloy has a eutectic point (melting point) that is lower and very sensitive to temperature changes, +/- 50º. when conducting your research).
- Flatten your material. Using the softer ends, bring the metal pieces together, place them on the edge, cut them a little and bend them slightly. For this we use a vice with parallel, flat jaws.
- Mix your flux with water, leaving it in a liquid state.
A note on flux : None of the sources I have suggested mention the use of flux when performing this process. For some reason, in all sources the process occurs without it. An acquaintance from the reactive metal studio had never heard of such a process using flux. I started using flux in a highly oxygenated propane forge, where my workpieces oxidize half as much.
We use active flux; it interacts with oxides and their secretions. Someone with little money like I have cannot afford to fail in the process many times, especially with silver or other precious metals.
Flux is my insurance policy - and I've had success with it. I left it very liquid, so we inadvertently created a trap inside the workpiece. I didn't have the luxury of running the experiment without him.
If you are using flux: Be sure to place a ceramic plate on any fire brick on the floor of the forge or furnace. Flux, especially the kind I use, will bleed through the firebrick properly. I don't know why, they just don't interact well with each other.
I wear latex gloves throughout this part of the process to minimize contamination.
- Scrape off any metal fragments using an abrasive, and remove and wipe them away, preferably with a lint-free cloth. Ian Ferguson suggests doing this with a damp cloth to also remove dust and particles. In my very limited experience, I have had difficulty keeping metal fragments from oxidizing without drying them immediately. The “wet-dry-wet-dry-wet-dry” process is too tedious and takes a lot of time, so I do the whole process immediately dry working with dry workpieces, and then I very carefully clean each workpiece from small fragments and dirt.
- Rinse each piece of metal with distilled water, it is better that the water is running, because such water will carry away small particles and fractions. (distilled water does not contain chlorine or other chemicals that can settle and affect the surface, it simply cleans the metal). Wipe dry with a clean cloth. You will notice that these same particles, dirt, settle on you, and therefore you will have to change your clothes quite often to avoid contamination. Get a clean change of clothes.
- Wipe each piece thoroughly with rubbing alcohol to remove any remaining grease, fingerprints, particles or other contaminants.
- Alternating metals, place your workpiece in the center of the rotating plate. After each piece is laid, brush flux on both sides of the piece, except for the top and bottom.
- Secure and tighten the bolt that secures the top of the rotating plate, making sure everything is aligned properly. (Some people use small, custom-made stainless steel boxes for this, but I've decided that it's not really necessary or significant.)
- Clamp the workpiece in a vise or press using as much pressure as possible. Tighten the bolts evenly.
Materials in oven on ceramic plate
Our main task is to initiate diffusion bonds in the metal. Three magic ingredients, temperature and pressure for a certain time.
- Place your mounting rotary plate in the oven and let the metal welding process take place for quite some time. The exact timing of this process is, of course, controversial. Ferguson has a handy table of experimental data that he uses to determine the exact time and how long this process should take, and I'm sure everything is verified and considered from a chemical or mathematical point of view. As for me, I chose a round number equal to two hours. My goal is for the workpieces to be thoroughly heated over their entire surface, so that there is enough time for the metals to anneal together simultaneously. I'm not too concerned about crystal growth when heated because I don't work with steel and I'm not versed in the performance characteristics of other metals.
- Take the workpiece out of the oven and quickly place it under the press, making sure that your plate with the workpieces is clearly in the center, and not with the part where the bolts are (which will come in handy). We use pressure of 5-10 tons. Keep your eyes open and keep a close eye on your workpiece. Silver presses and crumples very quickly due to its ductility, and I think you would not want to crush it too much by pressing too hard or too quickly.
- Retighten the bolts.
- Place the dough back in the oven for another 30 minutes or so and then press again. We are simply confident that our blanks will be compressed.
- The second time, unscrew the bolts on the plate and remove the workpiece.
The forging process is very delicate and careful, during which you will learn what all the previous four hours of work have led to. Here is the procedure I developed based on Ferguson's manual and Binnion's textbook:
- After heating the workpiece in the oven until red-hot, fire it. Let it cool a little. You should not forge it while the workpiece is at metal welding temperature, because the layers of the workpiece may move apart. You will feel the workpiece fall apart under the hammer and tongs. This is the saddest thing.
- I work with copper - brass, when such a workpiece is dull red in color, often annealing. Brass - Reddens very quickly, which means the metal is prone to cracking at certain temperatures, so I try to be very careful.
- When working with silver, I heat it until it gets very dark. Some people say that silver is too cold to work with and needs to be heated hotter, but when I had another chance to get it red hot while making rings, I was too scared to do it. The same friend mentioned above told me that the forging process after welding helps to strengthen the fragments in the workpiece.
- Tap the four protruding sides of the workpiece with a hammer, and then turn it over and align the workpiece symmetrically with the other side. I usually hammer hammer two sides of the piece, then anneal, two more sides, anneal, flip, repeat.
Oxidation lines on the top and side layers. Next, I trimmed and processed the sides of the workpiece
- Once the edges of the piece are aligned, use a band saw or grinder to level the piece, cutting off any overhangs. You will see areas on the metal where the workpiece is delaminating as a result of the oxidation process. Cut away and clean up these oxidation zones because one peeling corner can tear apart all the layers of the workpiece faster than you think. Ferguson has an excellent diagram showing shear changes in relation to stress and pressure in metals, it shows what makes the sides of the workpiece concave in order to reduce the stress on the metal when forging.
- Continue forging the workpiece from the edge to the center, annealing frequently. If you notice any flaking, sand and file them down. If you have several large peels and your workpiece is falling apart, then it is likely that the metal and workpiece were not cleaned correctly at the initial stage, which is where I start the whole process. If this does not work, try to identify and correct the problem during the pressing process and then during the forging process.
From this point on, you must use the workpiece for further work. At some point, you will begin to feel that the workpiece is ready for further work by hitting the hammer as if it were a solid block, and not as when pressing or hammering layers. You will learn to feel it. I recommend shrinking, forging the block to 1/2, 2/3 or even ¾ of the original size by hand before putting it through the rolling mill or rolls.
You can cut pieces or strips from the finished blank and use them to make rings and jewelry, you can roll it into a ring into any shape and figure using a beautiful pattern and texture and make whatever you want. I'm not going to go into detail, but you can look around, search on the Internet, and even in other books for anything you need for inspiration.
Good luck, and if you have any questions, please ask!
• Green circles indicate that the metals in that combination are the most easily joined and machined. Yellow circles mean that the metals in this combination are either difficult to alloy or difficult to process. • Red circles indicate combinations of metals that are either extremely difficult to alloy, extremely difficult to machine, or both difficulties present at the same time.
Important note: If the table indicates that two (or more) metals are compatible, this does not necessarily mean that their fusion into one briquette will be successful. Other factors must be taken into account, such as fusion methods and temperature conditions.
Based on source materials : https://www.jacoblefton.com
Many thanks to: Alexey Tuev and Dmitry Tataurov for translating the article.
All news
Related materials:
Editor's Choice: July | Trying on “vintage” jewelry | attention | flexibility | avant-garde | option | bracelet | tree | Design | gems | Classic shape | jewelry | modern technologies | taste | Handmade | a new style
Articles
- Trying on “antique” jewelry: mysterious Celts May 11, 2013, 11:30 p.m.
- Trying on “vintage” jewelry: at the very beginning January 22, 2014, 18:00
- Trying on “antique” jewelry: the greatness of Rome December 17, 2014, 18:00
Video
- Idylle by Guerlain. History of creation October 25, 2011, 11:03
- UltraHD technologies in everyday makeup from MAKE UP FOR EVER September 11, 2015, 14:00
- Fantastic New Year at ILE DE BEAUTE on Leninsky Prospekt December 20, 2021, 20:00
Heart made of polymer clay. Master Class
So, let's start creating earrings: 1. Roll out layers of clay in the following shades using a pasta machine, approximately 3.0-3.5 mm, in the following shades: white, purple, green and yellow. Using a square cutter, cut out two identical shapes from each layer.
2. Place square clay plates in a stack on top of each other in any order.
3. And now the most interesting thing, the resulting rectangular cane needs to be stamped, pressed, cut through with any available objects: a figured blade, small-diameter cutters, the point of a needle, etc. In this case, the upper layers of plastic will be pressed through and leave their imprints in the lower layers, so it is very important to press the layers to the very base of the stack.
4. The rectangular cane needs to be slightly compressed on all sides, while maintaining its rectangular shape. Now you need to use a sharp blade to cut the rectangular cane horizontally, thin sections with beautiful and different patterns. As you can see, the pattern on each section is chaotic and unpredictable.
5. Let's prepare the basis for future earrings. Using a pasta machine, roll out a layer of yellow clay that will correspond to the size of the heart-shaped cutter. There should be two such layers.
6. Select sections with patterns in which one color dominates. For example, I took sections with a dominant green pattern and a dominant purple color and covered both rectangular blanks with them. Residual sections of other colors must be placed on the reverse side of the rectangular blanks.
7. Roll the layers with a rolling pin so that the overlaps and seams are smoothed out and the surface of the workpieces becomes perfectly smooth.
8. Using a heart-shaped cutter, cut out two identical hearts from different layers.
9. Using a blade, cut the hearts down the center into exactly two halves. Connect the halves of hearts of different colors into one single heart. The result was blanks with two contrasting shades, despite the fact that we made the sections from one rectangular cane.
10. Roll out the pink layer on the thinnest setting of the pasta machine and cut out a heart-shaped shape with a cutter. Take a curly wavy blade and cut out the core of a pink heart, no more than 5 mm wide.
11. Decorate the middle of the hearts, thus hiding the seam at the junction of two different halves, with a pink curly strip.
12. Form small droplets from the plastic of the pink heart; from the sharp part of them, press a depression in the center with the edge and point of a needle or toothpick - these will be the future petals for the flowers.
13. Place 7-8 of these petals in a circle on the surface of the heart so that you get a flower with an empty core.
14. Form a small ball from yellow plastic, place it in the central recess of the flower and press down with the point of a needle. Before firing, do not forget to make a through hole in the workpieces. Place the hearts in the oven to bake. After heat treatment, it is necessary to coat the earrings with varnish.
Insert connecting rings into the holes, and thread the earrings into them. Polymer clay earrings are ready!
If you liked our site, express your “thank you” by clicking on the buttons below. Tell your friends. Thank you