Filigree (in Russian - scan , English filigree) is an openwork or wire pattern soldered to metal. And at the same time - a spoon and a glass holder in the buffet of many respectable families. The word “filigree” shows the essence of production: the Latin filum - “thread” and granum - “grain”, and the Russian “filigree” - from the Old Russian “skat” (to twist, twist). Most often, filigree is made of silver, but filigree patterns are also made of gold and other metals. Silver and gold are very soft and can be easily pulled out into very thin wires. The wire for the filigree pattern (silver, less often gold) can be smooth or twisted into ropes and spirals. Filigree was known throughout the ancient world (Crete, Egypt, Troy, Greece VI-IV centuries BC). This is one of the basic, “original” jewelry techniques.
Filigree or filigree?
Essentially, these two words mean the same thing.
Only the first - originally Russian - means “twist”, “twist threads”. The second is of European origin, more precisely Latin, and is based on the words “thread” and “grain”. So filigree is a certain way of making patterned products from thin wire, which is drawn from precious metals (silver, platinum, gold). The result is, simply put, wire lace.
To decorate such products, so-called grains - small balls - are often used. They are also made of precious metals - silver, gold.
Origin of filigree
Surprisingly, it, having originated in ancient times, continues to be used in modern times in almost the same form. It is wrong to think that filigree (filigree) first appeared in Ancient Rus'. This is wrong. Monuments of the 6th-4th centuries BC. BC, belonging to Greece and Egypt, prove a high level of mastery of this type of jewelry technology. However, the drawing method for producing wire was not known in ancient times. It was made from a metal rod by forging and polishing. In Rus', drawn filigree became widespread in the 10th century. Around the same time, grain began to be used in filigree items. And only in the 15-16th centuries very different materials were used: enamel, precious stones, wood.
Traditional jewelry technologies in Rus'
World jewelry art began with jewelry that was originally made from bone, seashells, etc. But in the 7th millennium BC. humanity invented the technique of mechanical processing of native stone, and in the 5th millennium BC. high-temperature melting of copper in furnaces and casting techniques appeared. Jewelry art is beginning to develop rapidly. On this page we will introduce you to traditional jewelry technologies that existed during the times of Kievan Rus and have survived to this day - such as casting, forging, chasing, embossing, niello, gilding, inlay, wire drawing, filigree and granulation.
Foundry
One of the most important methods of processing copper, silver and their alloys was casting. Due to its high cost, this technique, which required massive objects, was almost never used for gold, with the exception of small things. There are no fundamental differences between casting copper, bronze, brass, silver, and other alloys. Casting was the main method of metal processing by the village "smiths of copper and silver."
Casting in an ancient Russian village
Casting is the oldest technique, known to the population of Eastern Europe since the Bronze Age. The metal was melted in clay crucibles with the participation of bellows, which increased the temperature of the forge. Then the molten metal (or alloy of metals) was scooped out of the crucibles with a clay spoon, which had a special name “lyachka” (from the verb “to pour”). Lyachki were most often made with a spout for draining molten metal and a clay sleeve into which a wooden handle was inserted. The bottle with metal was heated over a fire, and then the liquid metal was poured into the casting mold; it was necessary to fill all its recesses with metal. When the poured mold cooled, a metal product was removed from it, exactly replicating the casting mold. The shapes and volumes of ancient Russian crucibles are varied. The capacity of the crucibles ranged from large volumes of 400 cc to small volumes of 10 cc. Crucibles could be round-bottomed or sharp-bottomed, less often flat-bottomed. The most common were cone-shaped crucibles with a rounded bottom. Crucibles were made of clay mixed with sand and fireclay.
Almost all casting molds were single-sided. Such forms were covered on top with smooth tiles, most often made of limestone. The front side of objects produced in this form was embossed, and the back side (touching the stone tile) was smooth.
Casting could be done in single-sided molds and without a smooth lid, directly in open molds. If both halves did not fit tightly against each other, then the metal seeped into the cracks and formed so-called casting seams, which were usually removed from the finished product. With a single-sided mold, these seams are located closer to the back flat side of the product. In order to make some kind of openwork pendant with slits in the middle, it was necessary to leave untouched in the mold when making it those places where there should be voids. Then these uncut areas on the mold will be in close contact with the mold's overlay lid, and metal will not penetrate there. If it was necessary to make a hole not in the plane of the thing itself, but, for example, an eyelet for hanging from a necklace, then for this purpose a channel was made in the mold, perpendicular to the casting, and an iron rod was inserted into this channel. The metal, pouring through the casting, flowed around the inserted rod, and when the rod was removed, a hole was created. The ornament, cut deep into the mold, naturally turned out to be convex on the finished item.
In addition to one-sided forms with a smooth lid, two-sided forms were also used, that is, those in which the second half was not smooth, but also figured. Sometimes both halves of the mold were made exactly the same, and the thing turned out to be symmetrical, with the casting seam going in the middle.
A soft clay mold was also used, which accurately conveyed all the processing details of the original model from which the mold was made. Clay forms are also known in cities - in Kyiv, in Chersonesos, but in cities they were not used as widely as in the countryside. In the city, the requirement for mass production forced the artisan to look for more durable materials than clay. Very interesting and original casting on a wicker model. At first glance, the things made using this technique seem to be woven from copper wires, but upon closer examination it turns out that they are cast. The wax model for such products was woven from waxed linen or wool cords, which easily stuck together and made it possible to weave complex patterns. The resulting wax model was doused with a liquid solution of clay, which enveloped all the thinnest recesses of the form. After the clay thickened, the model was poured several more times until a solid clay mold was obtained. The next task was to melt the wax and burn out the remaining cords.
This braided wax casting technique was widespread in the Northeast. In the Russian regions proper, this painstaking technique, which brought casting closer to lace knitting, did not enjoy much success.
Urban ancient Russian casting
In the early era of the development of the Russian city, many casting techniques were the same in city and village. For example, during the 9th-10th centuries. Urban foundries most often used wax casting, and only later did rigid casting molds appear. The ease of making complex patterns on wax has always attracted the attention of craftsmen to this type of casting. The only obstacle was the fragility of the resulting casting mold, which, although it could withstand several castings, easily chipped and broke. In the IX-X centuries. This technique was used to make pendants for necklaces, belt plaques, clasps for caftans (Gulbishche) and heads for neck torcs. Compared to the rural technique of processing a wax model, the following differences can be distinguished: urban foundries cut out the model with special cutters, not content with just extruding the pattern, which was used by rural craftsmen. Wax carving gave a bright play of light and shadow and made it possible to significantly increase the artistic expressiveness of the cast product. The lost form method was also used in the 11th-13th centuries. for casting the most complex objects. An important improvement in foundry was the discovery of the method of double-sided casting using two wax models, which was widely used in the 12th century.
Another type of foundry is casting in rigid molds.
The materials for making casting molds were various types of slate (including pink slate), occasionally limestone, and at the end of the pre-Mongol period - mainly lithographic stone, which allowed for particularly careful finishing. Very rarely, and only for tin casting, bronze casting molds were used.
Most stone casting molds are double-sided with the planes very carefully ground together to eliminate casting seams. To ensure the correct alignment of both halves, sockets were drilled in the casting molds, of which one was filled with a lead pin, adjusted so that it fit tightly into the free groove of the second half. This ensured the immobility of both forms. To cast three-dimensional objects with complex relief ornamentation, Kyiv jewelers invented three-part molds.
According to the nature of the finishing, all casting molds can be divided into molds with embedded lines and molds with convex lines. In the first case, the master did not need special care: he simply cut deep into the stone. A relief pattern was obtained on the finished product.
Forging and minting
These techniques are most widespread in the city. In most cases, various utensils were forged from copper and silver. The goldsmith cast a flat cake from silver (or copper), and then began to forge it on an anvil from the middle to the edges. Thanks to this technique, the thing gradually took on a hemispherical shape. By intensifying the blows in certain areas and leaving some places less forged, the master achieved the desired contour of the thing. Sometimes a tray was riveted to the bowls (the edges were rounded), and a chased ornament was applied to the rim and body. An example of forged silver utensils is the silver gilded charm of the Chernigov prince Vladimir Davydovich, found in the Tatar capital Sarai.
Forging work in jewelry technology was widely used for a wide variety of purposes. Of particular note is the forging of thin sheets of silver and gold for various crafts. Goldsmiths achieved the greatest virtuosity in the manufacture of gold plates for cloisonne enamel. The thickness of the gold leaf is measured in such plates not only in tenths, but even in hundredths of a millimeter.
The forging of silver and copper is almost inextricably linked with the coining of these metals. The embossing technique can be divided into three types: small-punch ornamental embossing, flat embossing and relief embossing. For some works, all types of coinage were used, but each of these types has its own technical characteristics and its own history.
The simplest type of embossing is that the design is applied to the outer surface of the item using various punches. The plate to be decorated was placed on a hard lining and a pattern was applied, compacting the metal in the place of the pattern, but without making bulges on the back. The pattern was applied with punches of various shapes: some had the appearance of a small chisel, others gave an imprint in the form of a ring, circle, triangle, etc. The most complete form of minting with miniature punches can be traced from Smolensk and Chernigov materials of the 9th-10th centuries. The small-punch minting technique originated in northern Russian cities in the 9th-10th centuries. and existed there in the future.
The second type of embossed work - flat embossing - is characterized by the creation of any composition by recessing the background around the intended figures. The work is carried out with the same miniature punches, but only with the simplest design - a solid circle, a ring, a dash. This method of embossing is always combined with working with a chisel. The minting was carried out as follows: a forged thin sheet of silver was nailed to a smooth wooden board, the contour of the design was applied to it with light pressure from the cutter, and then the background around the contoured design was recessed downwards by repeated blows with a hammer on the punch, as a result of which the design became embossed. Typically, the height of the relief with this method was small - 0.5-1.5 mm, and the relief was flat.
Examples of flat coinage include the famous silver frame of a turye horn from Black Mogila. It is a unique monument of Russian jewelry art of the 10th century.
Flat-relief coinage prevailed among the ornamental techniques of the 10th - first half of the 11th centuries. Around the middle of the 11th century. it is partly replaced by a new, improved technique of stamping or embossing silver on special matrices, which later developed into a favorite technique - “bass stamping” (multiple use of one stamp in the same ornament). The embossing is preserved only when making unique custom-made items. But at the same time, master minters are not satisfied with punch or flat chasing, but work in a third way - the method of relief, convex chasing, which in ancient Rus' was called “armor work”.
The essence of convex coinage is that first the ornamented silver plate is minted from the reverse side, squeezing the design outward with a sharp convex relief. Only after such embossing has produced a convex pattern on the front side, the front side is subjected to more detailed processing: clothes, face, hair are cut, and the general relief is corrected. In order not to tear the thin metal during such deep, convex embossing, the work is carried out on a special elastic cushion made of var, wax or resin. This technique was much more complex than simple obverse embossing. Armor coinage appears around the 12th century. Examples of this coinage are found mainly in Veliky Novgorod.
Embossing and stamping
The improvement and mechanization of the process of flat-relief coinage was the use of special stamps or matrices, with the help of which a relief design was imprinted on thin sheets of silver or gold. The technique of silver embossing acquired particular importance due to the widespread use of niello art, which required a protruding relief design and a recessed background.
Mostly silver was used for niello, as it gave a clear and bright pattern against the background of velvety niello. In order to carry out this play of silver and niello, ancient Russian masters usually did this: a design was applied to a silver plate with a light outline, then the background around this design, intended for niello, was recessed in such a way that the design itself was higher than the background, as on the background plane a layer of blackening mass must be laid. Embossing was done on thin sheets of gold, silver, and less often copper, by placing them on metal (copper, steel) matrices having a convex pattern. A lead plate was usually placed on top of the sheet on which the matrix design was to be stamped and this soft pad was struck with a wooden hammer, forcing the lead (and then the silver sheet) to fill all the recesses of the matrix. The ductility of lead contributes to the exact repetition of the shape of the matrix on the processed silver sheet. At the end of the embossing, a plate with a double pattern is obtained: on the front side the pattern of the matrix is repeated, on the back there is the same pattern, but in a negative form. There is inevitably some discrepancy between the relief of the matrix and the relief of the finished product, due to the thickness of the metal sheet. The thicker the sheet, the smoother and flatter the relief on the front side will be.
Of particular interest is the time when a new technique appeared, replacing painstaking chasing work. The time when the embossing technique appeared was the era of Olga and Svyatoslav - the middle of the 10th century. Most likely, the emergence of a new technical method in the work of Russian city jewelers is connected to a certain extent with the influence of Byzantine culture and was one of the positive results of rapprochement with Byzantium.
Black
Enamel was used most often on gold, and niello was used in silver. “Where gold replaces silver, there enamel replaces niello.” For cloisonne enamel, silver is a second-class material due to the fact that it is less soft and malleable than gold and melts more easily: the melting point of silver is 960.5 °, and the melting point gold 1063°. Therefore, it is more difficult for an enameller working with silver to make thin partitions for the enamel and solder them in an oven with the bottom of the tray so that they do not melt. During the process of making niello, such delicate operations were not performed.
The niello is best preserved in the recesses of the design, so the creation of a suitable bed for it was achieved most naturally through engraving. As a result, the master received a blackened drawing on a light background. Another way - blackening the background with a light pattern on it - involved deepening the surface for the black. In all these cases, gilding was also widely used. All of the listed techniques - engraving, gilding, blackening - fundamentally changed little. Thus, chemical studies have shown that the blackening recipe described by Pliny the Elder passed from antiquity to metalworking of the early Middle Ages practically unchanged.
The first stage in the complex process of producing silver jewelry with niello was the production of the item itself, which was to be decorated with niello. Casting was used less often for this purpose. Only the tips of twisted bracelets and some rings with niello were cast, but in general, casting is a very inefficient way of making things from precious metals. Typically, blackened items were made from a thin sheet of silver. To create a hollow body from it in a cold state, a very ancient method was used - hand-punching (difving). It is based on such a property of silver as viscosity, due to which the sheet processed by blows with a wooden hammer stretches, bends and takes on the required shape. This is how some colts and hoops were made for individual orders.
Mass production required an easier method. It turned out to be embossing on the matrix. The matrices, cast from copper alloys, had a convex outer surface and a flat inner surface. The first, when embossing, provided the plate with a convex surface, the second made it possible to tightly secure the matrix on the workbench. During excavations, similar matrices were found more than once. They differ only in greater or less thoroughness of execution.
The second stage in the manufacture of hoops was engraving - an art closely associated with the mob. Engraving is the carving of a design on metal, in which a linear design is applied to the metal using a steel cutter, or, as jewelers call it, a graver. The ancient engraved products that have come down to us differ from each other in the various traces left by the graver. In ancient Rus', as now, craftsmen used gravers with a working edge of various shapes.
A radial needle is used to perform the first engraving operation—transferring a design from paper to metal. The plate on which the drawing must be transferred is fixed motionless on a special pillow. Such a cushion can be resin heated in a vessel, as is done during coinage. After this, a thin layer of wax is placed on the workpiece. The drawing, made with a pencil on tracing paper, is applied to the wax with the front side and lightly pressed down, which leaves an imprint on the wax. This operation could also look like this: a wooden stick with a pointed end is drawn along the lines of the drawing. When the paper is removed, the deep lines of the translated design remain on the wax.
It is difficult to say how the transfer of drawings onto metal was practically carried out in ancient times. One can only say that this process took place, as evidenced by the perfect engraving of such subjects as complex braiding, impossible without a preliminary sketch and translation. The translation of the drawing easily explains the amazing closeness of the subjects engraved on hoops with the ornamental subjects of handwritten books of ancient Rus'. The design was passed along the line of the silver workpiece transferred to the wax surface with a radial needle, and it was finally fixed on the metal.
The final stage of work on the decoration with niello and engraving was the actual nielloing. The niello on ancient Russian jewelry varies in density and tone. Sometimes it looks black and velvet, sometimes it looks silver-gray with a slate tint. This depends on the different formulations, the intricacies of which we could only penetrate through chemical quantitative analysis. Since such an analysis requires a significant amount of mob and partial destruction of an ancient thing, this method of research cannot be used. Already in the 10th century. we encounter silver items decorated with a niello pattern. V.I. Sizov identified among the Gnezdovo materials plaques of Russian work, with a background filled with niello. The black ornament adorns the already mentioned turium horn from the Black Tomb.
The composition of the black mass includes: silver, lead, red copper, sulfur, potash, borax, salt. This mixture is usually stored in powder form. Until the end of the 12th century. in blackboard art, a black background and light relief figures on it dominated.
Samples of rabble from the 11th-13th centuries.
Inlay
We find the simplest and oldest type of inlay on spurs of the 10th-11th centuries. A series of indentations were made in the hot iron with a thin chisel, which were later hammered with small gold or silver nails. Gold was sometimes driven flush with the surface of the iron, and sometimes protruded in the form of small tubercles.
Inserting gold wire into iron and covering large areas of iron with silver sheets (often followed by gilding) were also used. To do this, the surface of the iron was either cut with an oblique groove (for wire) or completely covered with notches and roughness for better adhesion to silver.
An example of solid silver padding is the helmet of Yaroslav Vsevolodovich, the body of which, free of gilded chased overlays, was stuffed with silver. Battle axes were decorated with inlays and overlays.
Gilding
It found wide application in everyday life in Kievan Rus and allowed for several different methods of applying gold. The least used method was the application of gold foil as the least durable method of connection. In products of the 9th-10th centuries. Gilding is used very widely, playing an important role in the decoration of various products. The oldest monument should be considered a fragment of a copper plate from Kyiv with a gold design depicting a city with part of the fortress wall, a tower, a boat with a high curved bow and a crowd of warriors with spears and shields. The warriors are beardless, without mustaches, and their hair is cut into a circle. It is quite possible that, unlike other doors of church use that have come down to us, the Kiev fragment belonged to the door of a secular palace, since the images on it are devoid of any admixture of churchliness.
Copper plate with gold design (Kyiv)
The invention of gold writing freed the artist from the tedious physical work required in inlaying, allowing him to freely create complex and intricate patterns and compositions.
In this regard, Russian jewelers overtook their Constantinople, Italian and Rhineland contemporaries, creating a new type of gilding technique. Judging by the fact that this technique survived the Tatar pogrom and continued to exist in Novgorod in the 14th century, one can think that in the 12th-13th centuries. it was widespread in all the most important Russian cities (Kyiv, Novgorod, Ryazan, Suzdal).
Wire drawing, filigree and graining
One of the most important sections of jewelry technology in ancient Russian cities is wire drawing. The need for wire was great and a lot of it was required for various needs. Copper, silver and gold wire were used for various products. Large-caliber wire was used to make hryvnias and bracelets, thinner ones were used for temple rings and chains, and the finest wire threads decorated the surface of various objects with a complex and elegant filigree pattern.
An interesting piece of copper wire harness for hryvnia was found in Kyiv. The master made a thick wire in advance, twisted it into a bundle, and then twisted it into several rows. As needed, a piece was cut off from the workpiece and a hryvnia was made from it. The found tourniquet costs 8-10 hryvnia.
Here we have an example of the transition from working to order to working for the market. The master pulls the wire in advance, even before receiving an order for hryvnias, prepares the raw materials for them - a tourniquet. It is quite obvious that the master made the blank in anticipation of future orders and did not dare to cut the wire, since the hryvnias could be ordered in different sizes. From here it is only one step before the master decides to prepare for future use not only wire, but also the very hryvnias; in this case, his workshop would simultaneously become a place for selling jewelry.
Thin wire was used to make a variety of filigree patterns. Filigree, Russian filigree (from “skat” - to twist, twist), is twisted wires that form some kind of pattern. The filigree can be openwork, when the wires themselves form the frame of the thing, but it can also be an overlay on a plate. In both cases, soldering is required to fasten the threads to each other or to the plate.
The graining technique that always accompanies it is absolutely inseparable from filigree - soldering the smallest grains of metal onto a plate. Grains of gold or silver were prepared in advance from tiny drops of metal, and then placed using small tweezers on an ornamented plate. Then everything followed the same as with the filigree: they sprinkled it with solder and put it on the brazier. It is possible that during this work they used copper soldering irons heated in the same brazier. Soldering irons were used to correct those places where the solder did not grip the grain or thread well.
To prepare the grain, modern jewelers practiced the following simple technique: molten metal (gold or silver) is poured into a reservoir of water through a wet broom or sieve, spraying the metal into tiny drops. Sometimes casting molten metal through a stream of water is used; This technique was difficult for ancient Russian masters to implement, since it required a horizontal stream of water. The grains of the frozen metal had to be sorted by size, since with the methods described they could not be obtained even.
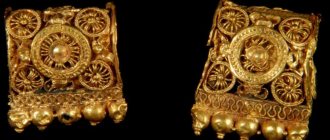
Grain and filigree were found in Russian burial mounds starting from the 9th century, and subsequently became the favorite technique of urban goldsmiths. In early times, silver moons were especially diligently decorated with grains. Some of them have 2250 tiny silver grains soldered on them, each of which is 5-6 times smaller than a pin head. For 1 sq. cm accounts for 324 grains. On grained Kyiv colts the number of grains reaches 5000.
Sometimes cloisonné grain was used. A thin smooth wire was soldered onto the plate - the frame of the drawing. The space between the wires was densely filled with grain, which was soldered all at once.
A special decorative technique, which appeared hardly earlier than the 12th century, was soldering miniature wire rings onto a hollow silver ball, onto which one grain of silver was attached on top. It was with these technical techniques that star-shaped Kyiv kolta were made. The diameter of the wire from which the rings were made reached 0.2 mm. The painstaking work was rewarded by the subtle play of light and shadow.
One of the uses of filigree was the ornamentation of gold and silver planes on large items such as icon frames, kokoshniks, large kolta and “barmas”.
The development of filigree technology with spiral curls influenced the ornamentation of the 12th-13th centuries. In fresco painting, in miniatures and in applied art, it was at this time that the spiral pattern appeared.
Just as in casting and other sections of urban jewelry technology, and in the field of filigree and granulation, we are faced with the presence of wide mass production along with the work listed above for discerning customers. In the mounds of the Dregovichi Drevlyans, Volynians, and partly Krivichi, copper beads made of a wire frame with blue grains on it are found.
Over the course of a long time, ancient Russian masters improved their skills, reaching higher and higher levels. Craftsmen were engaged in pottery, wood carving, stone processing, etc. at the highest level, but they achieved the most excellent results in metal processing. They mastered all the techniques of jewelry art. Old Russian masters used the techniques of filigree, graining, casting, embossing, forging, inlaying, drawing, blackening, etc.; they even mastered the prohibitively complex technique of cloisonné enamel.
Blacksmiths were engaged in casting silver and bronze, creating real works of art. But jewelry work in the Old Russian state was not limited to casting. Many cast items were decorated with unique engraved and embossed designs and inlaid with precious stones. The uniqueness of the jewelry traditions of Ancient Rus' lay in the versatility of the craftsmen who knew how to work with all known techniques.
Russian craft
Filigree in Ancient Rus' is a kind of calling card of original Russian jewelry art. This technique was widely used to make not only jewelry, but also church utensils, frames for sacred books and icons, weapons, and household items. For example, even morocco boots were decorated with filigree.
In the 17th century, special workshops were opened in Rus' in which they were engaged in the manufacture of wire (drawing). And at the monasteries, in the princely estates, workshops were opened in which real talents of filigree work worked. Chronicle sources name Ivan Fomin and Ambrose as the most famous masters of those times.
Filigree are very expensive products that were available only to rich people. After all, it was delicate manual work, requiring the master to have accumulated years of experience, which contained the secrets of mastery.
How to wear filigree jewelry: our recommendations
Wearing filigree requires an approach: its “lace” requires a contrasting background, stylistic unity with clothing. Light filigree looks luxurious on dark skin, looks clear against the background of dark hair, and goes well with a dark manicure. Blackened filigree is especially effective on pale skin, or with pastel-colored clothing. In a word, any contrast - color, graphic or texture (we mean smooth fabrics: satin, satin, etc.) will “reveal” a filigree product. And if everything is taken into account, then know: wearing filigree, you will not get lost in the crowd.
JEWELRY MAKING | Jewelry techniques - types Jewelry with enamel | Hot and cold enamel technique | Cloisonné technique | Georgian cloisonne enamel | Rostov enamel
Metal chasing. Metal engraving technique. Embossing on metal Blackening of gold and silver. Northern blackening plant - blackening classics | Metal etching. Chemical gilding. Silvering of jewelry. Oxidation, and other coatings | Chainmail weaving and its types
Share this article with your friends
Works by designers from the JEWELIRUM catalog
- Co.Cos Jewelry
- Co.Cos Jewelry
- Taiga Jewelry, Tomsk
- Taiga Jewelry, Tomsk
- Ilya Maksimov, Crimea
- Ilya Maksimov, Crimea
- UBIRING
- UBIRING
- Diamonds are Forever
- Diamonds are Forever
- Rings in natural style, Sergacheva Jewelery
- Earrings with pearls, Sergacheva Jewelery
- Cabochon ring, Minty Sky
- Fly earrings, Minty Sky
- Ring, Precious Park
- Ring, Precious Park
- Snake skin ring, Stoyanova Jewelery
- Chain earrings, Stoyanova Jewelery
- Children's pendant - stick, Matthew&Daniel
- Pendant for a child, Matthew&Daniel
- Bracelet, Svetlana Subbotina
- Ring with Slavic symbols, Svetlana Subbotina
- Indian style ring, Anna Goffman
- Indian style ring, Anna Goffman
- Earrings, ISTA
- Geometric ring, ISTA
- Earrings with enamel, PNJewelry
- Ring with enamel, PNJewelry
- Ring, Khramtsova Jewelry
- Ring, Khramtsova Jewelry
- Wedding rings to order, obruchalki.com
- Wedding rings to order, obruchalki.com
- Earrings, Yuri Bylkov
- Earrings, Yuri Bylkov
- Titanium bracelets, LanaMuransky
- Titanium pendant, LanaMuransky
- Brooch Elephant (after Salvador Dali), THING
- Ring Veil, THING
- Mace earrings, VLADIMIR MARKIN
- Cufflinks, jewelry mechanics, VLADIMIR MARKIN
- Drop-shaped ring, EKATERINA TOLSTAYA
- Drop-shaped earrings, EKATERINA TOLSTAYA
- Necklace with amber, LETA
- Earrings with amber, LETA
- Children's earrings, combinable, FASHBY
- Children's earrings, combinable, FASHBY
- Ring of architectural form, Elizaveta Malafeevskaya MANU_L
- Architectural bracelet, Elizaveta Malafeevskaya MANU_L
- Set Ginkgo Leaf, SHABUT JEWELLERY
- Brooch Wearable porcelain, SHABUT JEWELLERY
- Architectural ring, GEOMETRY
- Brooch, porcelain, GEOMETRY
- Necklace made of polymer clay, LICORNE ART
- Brooch made of polymer clay, LICORNE ART
- Ring, avant-garde, VALERY SEREDIN
- Bracelet, avant-garde. VALERY SEREDIN
- Wooden set, Scandinavian/Japanese minimalism, VLADIMIR SHESTAKOV
- Ring, Scandinavian/Japanese minimalism, VLADIMIR SHESTAKOV
- Earrings, TON ANT
- Ring, TON ANT
- Architectural ring, ANCHOR
- Architectural necklace, ANCHOR
- Earrings, GOHFELD JEWELLERY
- Necklace, GOHFELD JEWELLERY
- Massive ring, YAKISCHIK
- Designer jewelry, YAKISCHIK
- Architectural ring, ONE DAY ART
- Architectural ring, ONE DAY ART
- Brooch, bionics, VALERIYA MARKOVA (TESSA)
- Unclosed ring, bionics, VALERIYA MARKOVA (TESSA)
- Ring, bionics, BEAVERS
- Earrings, bionics, BEAVERS
- Earrings, asymmetry, VAGANOVA JEWELRY
- Airplane ring, VAGANOVA JEWELRY
- Flower ring, ALCHEMIA JEWELLERY
- Set, ALCHEMIA JEWELLERY
- Pendant-cat, ethnic, STUDIO OF ILYA AND VERA PALKIN
- Earrings, STUDIO OF ILYA AND VERA PALKIN
Comments
- Natalia
help me find a jeweler who works in filigree technique. I want to order a bracelet in the style of ancient oriental filigree. Thank you
7 years ago Reply
- juvelirum
Natalya, good afternoon! Unfortunately, we personally don’t know any jewelers who specialize in filigree or filigree. Try asking a question on jewelry forums or go to the nearest jewelry exhibition, where there are usually many craftsmen (exhibition schedule:)
7 years ago Reply
- Emma
in the Altai Republic, Ongudai district from Kupchegen, there is a workshop there that makes a lot of beautiful handicrafts from leather, iron, wool, felt, including filigree.
6 years ago Reply
- Ilyas
I am a jeweler artist, write to me.
5 years ago Reply
I make jewelry using the filigani technique, I have experience, +79821025673
4 years ago Reply
Periods of prosperity and decline
In the 18th and 19th centuries, filigree in Rus' experienced a period of prosperity. The range of products made using this jewelry technique is constantly expanding. Workshops appear in many cities, and soon factory production of scanned products is established.
The beginning of the 20th century, for obvious reasons, was a period of decline - war, revolution... Of course, there was no time for jewelry.
However, in Soviet Russia it is being revived again. And to such an extent that it gains worldwide fame. In 1937, at an exhibition in Paris, the products of craftsmen from the Krasnoselsky Handicraftsman artel received a gold medal, and they were also shown at an exhibition in New York (1939).
Products by craftsmen from the village of Kazachkovo (Nizhny Novgorod region), the village of Mstera (Vladimirov region), and the city of Privolzhsk (Ivanovo region) were also valued.
Over time, large factory production of filigree jewelry appeared in Moscow, Leningrad and other cities.
Where can you buy real filigree jewelry?
Unfortunately, finding true filigree is not so easy. Not all jewelry enterprises (and KPHI is a typical example) disclose on their websites the names of retail chains with which they cooperate to sell products. As a result, you can completely accidentally “come across” scanned items by simply going to a regular jewelry store near your home - with the same success as not finding it at all, having walked around a dozen stores.
One of the more reliable ways today is to attend jewelry exhibitions, which are regularly held in Moscow and other large cities (jewelry exhibition calendars). More or less serious jewelry companies from different parts of the country are represented there, making jewelry using a wide variety of techniques. And you can even meet those manufacturers who do not sell through stores at all, whose assortment can be seen exclusively at exhibitions.
If you wish, you can also try searching for filigree products made in different countries (including eastern ones - Nepal, Thailand) in online stores, as well as on the websites of private jewelers, websites for collectors, or foreign stores or hand-made resources like etsy.com. On the latter you can find beautiful antique specimens.
As we find manufacturers and retailers offering real filigree, we will add them to our Manufacturer Directory and Seller Directory, where you can find them by specifying your search parameters.
Products with “filigree elements” versus “true filigree”
Jewelry almost always contains filigree elements: a scattering of beads of grain, a cord or rope of metal around an insert with a stone or pearl. Sometimes filigree curls and grains are soldered onto cast or stamped parts of the jewelry. On the one hand, this is no longer completely filigree and not purely handmade. But such “combi-filigree” is often stronger, cheaper and more accessible than its noble “cousin” - pure hand-made filigree.
The balance of aesthetics and practicality will give the buyer the desired vector. Let's say the strength of the earlobe is not limitless. And your goal is voluminous earrings or a pendant. In openwork hand-made filigree, the ratio of dimensions to weight is the most humane, perhaps this is “to your advantage” (to your ears). Bracelets and rings may require greater strength, and then “mixed” filigree will seem “stronger” than filigree. The main thing, as always, is to understand the difference between true filigree and its imitation, consciously giving money for this or that product.
For comparison: on the left is a ring with “filigree elements”, on the right is a filigree bracelet
Types of jewelry filigree
Depending on the method of making products, filigree can be of three types. In soldered filigree, a wire pattern is soldered onto a metal base.
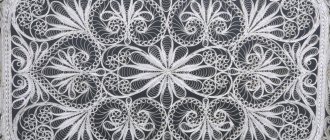
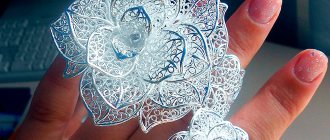
In openwork filigree there is no base, wire patterns are fastened to each other, and metal lace is obtained. It is openwork filigree that is often called Russian filigree abroad.
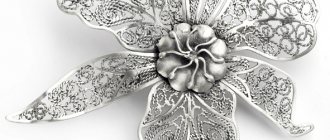
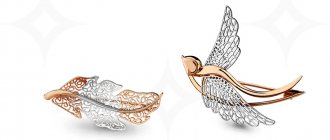
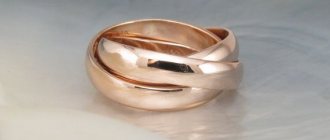
The third type is volumetric filigree. As a rule, these are products consisting of several parts. So, these parts are also made separately using the filigree technique, and then combined into a single whole. These could be, for example, figurines of animals, a tray, a vase, a glass holder. Filigree gives these products sophistication and uniqueness.
Materials for filigree
Since ancient times, it was believed that silver and gold were best suited for filigree. These noble, soft and impurity-free metals are easily drawn into wire. For example, a thread that can be made from 1 gram of gold will be about 2500 meters long.
However, scanned items made from precious metals are very expensive, so other materials have begun to be used to make them cheaper.
First of all, copper, because it has high ductility and softness. In addition, copper thread can be easily silvered or gilded.
Aluminum, cupronickel, brass and some other metals are also used. The main thing is to be able to pull a thin wire out of them. After all, filigree is a product consisting of wire patterns.
Technology
In accordance with technological features, there are three ways to manufacture filigree products . Brazed filigree: a wire pattern is soldered onto metal plates. Openwork filigree: it does not have a metal base; a lace transparent object is created by fastening wire parts .
There is also 3D filigree – these jewelry pieces have many filigree components. This technique is used to make vases, glass holders, figures, boxes, various accessories, and elegant trinkets.
Filigree is a handmade art; the existence of factories does not in any way negate the individual character of each product. To make a new creation in accordance with the plan, to come up with a new pattern, to achieve high quality is the destiny of jewelers working in the filigree technique.
The material for filigree is not only silver and gold various alloys are used for it . The initial stage is the production of thin threads themselves with a certain, uniform thickness.
The diameter of the wire varies – this is necessary for greater expressiveness of the jewelers’ creations. Some of the wire is twisted, some is left smooth.
The prepared material corresponds to the drawing, project, sketch of the new jewelry. A jeweler can bend the wire in accordance with the intended lines and intertwine it using special tools.
The interweaving of metal threads is practiced in a wide variety of ways. Openwork details are prepared sequentially, according to a pre-thought-out plan. Then they are soldered together. A metal base is necessary to hold some products together.
Scanning technique requires skill
Indeed, every master scanner has his own secrets of mastery. Even now, when factory production of such products has appeared, the share of manual labor remains large. And it depends on the master, on the skilled artist, how high-quality and beautiful the thing made using the filigree technique will be.
The thickness of the wire for various elements of the product, the amount and composition of solder, the duration of firing the wire... Every master has a lot of secrets. However, the main stages of work remain unchanged. You shouldn’t stop at the production of the wire threads themselves. Filigree is still the actual execution of a product, or even the creation of a work of art.
Having sorted the wire by thickness, the master twists it or leaves it smooth - it all depends on the product he is starting to work on. By the way, before starting it, he must make a full-size sketch of the product. Work is carried out on each detail separately. They bend strictly according to the sketch. For small ones, special tools such as tweezers are used, and large ones can be dealt with with your fingers. When making openwork patterns, the parts are first glued to the sketch and then soldered together. The paper on which the sketch is applied burns out when soldered, leaving only the product.
The soldered filigree is immediately attached to a metal base.
The final procedure is to silver plate the item and polish it.
The secret of skillful soldering of filigree and grain products
One of the most important issues for a master scanner is the cleanliness of the solder, which should not fill small parts and thereby disrupt the clarity of the pattern. On very ancient objects made of filigree and grain, the solder is so invisible that it seems as if some invisible glue is holding the individual parts together.
Old Russian masters of filigree work also achieved great purity of work. This question has long been of interest to scientists and craftsmen from different countries. The famous Italian sculptor and jeweler of the 16th century, Benvenuto Cellini, dwells on it in detail in his treatise on jewelry; Many attempts to repeat the ancient originals with their inherent purity of work were made in different years by Western European scientists, but all were unsuccessful.
The lost secret of the ancient technique of invisible solder was revealed as a result of experiments conducted by Soviet researcher Professor F. Ya. Mishukov. He proved that instead of solder, ancient jewelers used an amalgam of gold, silver and mercury.
Sheets of thinly flattened so-called gold and silver leaf were ground in the proper proportion with a small addition of mercury to obtain an amalgam of the desired thickness. This amalgam was used to smear individual parts of the filigree ornament and balls of grain, after which the object was strongly heated. The mercury evaporated, and the parts of the ornament were firmly connected to each other.