Complex, painstaking work requiring great skill. The process of making any jewelry begins with an idea: first, a design is developed, a sketch is drawn and adjusted, and a 3D model of the future product is created. Once all details are approved, production begins.
At jewelry enterprises, artists work closely with technologists, because it is not always possible to create something that looks beautiful in a sketch. Unfortunately, the technological possibilities of jewelry are not limitless.
Filigree
You've heard the word "filigree" and always associated it with the meaning of "particularly careful" and "attentive to detail." You are absolutely right.
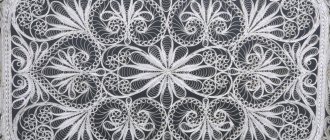
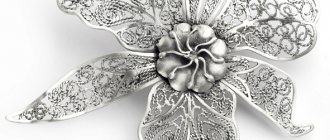
Filigree is a jewelry technique that is used by experts to create patterns from thin silver or gold wire. Filigree patterns can be in the form of herringbones, ropes, weaving and other patterns. This jewelry work is done under a microscope.
The term "filigree" has Latin roots. It comes from the words filum - “thread” and granum - “grain”. There is also a native Russian analogue - filigree jewelry technology. This word comes from the Old Russian “s’kati”, which means “to twist” or “to twist”.
Filigree is found both in jewelry and in boxes, vases and even on the hilts of ancient swords.
If you see a similar pattern on a piece of jewelry, you know that it is filigree.
Jewelry technicians
At all times, jewelry has been a luxury item. One of the first metals discovered by man was gold. It attracted the attention of ancient people with its bright yellow color and ease of processing. The masters of Ancient Egypt, using primitive tools, created real works of art from this precious metal.
The achievements of modern science and the development of jewelry technology today make it possible to improve the natural appearance of precious and semi-precious stones. Special processing processes can give stones the desired color, clarity, strength, as well as increase their value and make them suitable for further use in jewelry.
Currently, there are many types of jewelry techniques that are widely used for making and decorating products. The most common technique used in almost all jewelry industry enterprises is stamping, which creates products of complex shapes.
Precision casting techniques are used to produce both voluminous and lightweight jewelry, which have gained particular popularity these days. Diamond milling is used to decorate jewelry, with the help of which various ornamental compositions are created.
Only a highly qualified master jeweler with creative imagination can truly highlight the beauty and attractiveness of a stone.
The main methods of processing precious stones are cutting and polishing. Thanks to cutting, the stone receives a certain shape and begins to glow with new bright and pure colors. As a result of polishing, gems acquire a smooth surface and a mirror-like shine, and the clarity of their natural pattern is enhanced.
Unique technologies and modern equipment allow us to work with any type of precious stones, while creating high-quality jewelry of a high level.
On our website www.jevel.ru you can find all the information you are interested in about jewelry, learn about the materials and tools used in their manufacture. The site provides a detailed description of all technological processes, new jewelry techniques used in creating jewelry. By looking at the jewelry social network, you will get acquainted with interesting facts regarding jewelry art, learn how a piece of jewelry is born, and how you can create it yourself with the help of simple devices.
Diamond cut
This is a modern technique for processing precious metals. Its principle is that gold and silver are processed at a special angle by special cutters at different depths. After applying a diamond facet to the jewelry, the finest patterns are obtained that sparkle in any light, like real diamonds.
Enamel
The word has Greek roots and means “I mix.” In jewelry, enamel is the creation of designs on enamel. Jewelry enamel is not ordinary. It consists of transparent or opaque lead glass that covers the products.
Enamel is used on crosses, images of saints, icons and other similar objects. This is an excellent decoration that ensures longevity of jewelry.
It is thanks to enamel that icons are stored for so long that after hundreds of years they retain their original qualities and become antique.
Famous masters
The unique “rays”, “ears of barley”, “zigzags” and “moire tints” of guilloche are created thanks to the special flair of the master. Unlike conventional engraving, where the jeweler's hand moves the cutter along the surface of the product, guilloche requires movement of the part itself relative to the cutter - the master does this with a movement of his thumb.
Of course, few have achieved perfection in such a technique. Before the great Faberge in Russia, the guilloche technique was mastered by the jewelry industry, which has been working in Stockholm since 1916 as the official supplier of His Royal Majesty’s jewelry.
An outstanding guilloche artist was Mikhail Evlampievich Perkhin. His skill is all the more amazing because Mikhail Evlampievich was a peasant and self-taught. It is to Mikhail Perkhin that we owe the unrivaled Imperial Easter eggs: he was responsible for their creation until his death, each bearing the master’s mark “M.P.”
Johan Benzinger is a famous master from Pforzheim (Germany), a town that has become the world center of guilloche craft. He has been called a living icon of guilloche. He studied with the best engraving masters, and mastered the handcraft of guilloche on his own. Johan is a decorator at the Grieb & Benzinger watch studio, which produces unique products for collectors. He works on antique guilloche machines, the newest of which was produced in the 50s of the 20th century, and repairs and restores them himself.
Sergei Ivanovich Kvashnin is a full holder of the Order of Carl Fabergé, deputy chairman of the awards committee of the International Carl Faberge Memorial Foundation and, among other things, an outstanding master of guilloche.
Sergey Ivanovich is the author of original engraving and guilloche machines, patented by Rospatent. His machines allow him to make more than 100,000 guilloche patterns - several thousand times more than the great Faberge. The founder’s skill makes it possible for the Kvashnin jewelry house to make any customer’s dreams come true. We are capable of creating both collectible masterpieces and simply beautiful things for everyday use.
Imbued with the charm of this technique, you will definitely want to get an accessory with a guilloche surface.
By visiting our catalog, you can easily choose a gift for yourself or a loved one. And subscribing to new articles on our blog will allow you to keep abreast of new products on the jewelry market. comments powered by HyperComments
Blackening
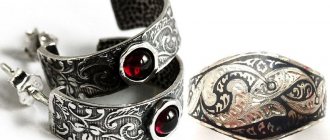
The word “blackening” itself already describes the process and result of the artistic technique. It consists in applying a special mixture (niello) to the relief of the jewelry.
The result is an effect that creates a contrast between the color of the precious alloy and the black mass inside it. Blackening gives the jewelry a special beauty and protects the jewelry from chemical influences.
The most popular metal for blackening is silver. Sometimes jewelers also blacken gold, but do not carry out such treatment with other precious metals.
An art that has stood the test of time
Guilloche originated in the Middle Ages. It was then that craftsmen, using an engraving machine, began to apply patterns of wavy lines arranged in a certain geometric sequence onto a rotating or flat workpiece. Slowly, line by line, the finest lacy interweaving of strokes was created.
The art of guilloche reached its peak of popularity in the 17th-18th centuries, when even royalty became interested in creating patterns on metal.
The leading contribution to the development of turning and copying machines in Rus' was made by a Russian nugget, the personal turner of Peter the Great, Andrei Nartov. His machines remained in the Polytechnic Museum in Moscow and their operating principles have remained virtually unchanged over time.
Each era added something new to technology. Not only the engraving machine was improved, but also the subtleties of applying the pattern.
In the 19th century, interest in guilloche grew with renewed vigor. This happened thanks to the revolutionary discovery of Carl Faberge at that time - applying enamel to a guilloche background.
While studying in Europe, Maestro Faberge became very interested in guilloche machines and brought the same one for himself. In working on it, he achieved the greatest skill and amazed his contemporaries with the variety of designs and shades of enamel.
The Faberge firm produced over 200 variations of guilloche, using more than 150 shades of colors, while other jewelers could decorate their creations with only a few, the simplest colors. Fabergé's famous Easter eggs and photo frames still amaze with their subtle play of shades and the perfection of the smallest details.
Guilloche patterns are so complex and unique that they have historically been used as one of the types of security for banknotes. Which, unfortunately, in Soviet times led to a complete ban on its use in other industries and these machines were developed only by skilled craftsmen.
By the end of the century, the rapid development of technology and assembly line production began to displace hand crafts. This also affected the guilloche technique.
An interesting fact is that by the end of the 17th century, almost all wealthy people had machines for applying guilloche patterns. In high society it was considered quite fashionable to decorate boxes with unique patterns yourself. Not only men, but also women practiced this art. Queen Victoria herself considered it a worthy task to while away the evening at the lathe and decorate a compass or mirror with her own hands.
Engraving
Engraving is the application of a design, ornament or inscription to a piece of jewelry. The engraving result is always in relief. One part of the pattern has a recess, and the other is convex.
Previously, every jeweler applied engraving using special cutters. This work was long and difficult. Microscopes have simplified the process somewhat, but not to perfection.
Nowadays all major jewelry companies do 3D engraving. Its essence is as follows. Designers give programmers the design they want to see in the image. The developers write a special program, thanks to which lasers apply the desired pattern in a matter of seconds.
You can talk endlessly about how hand engraving is done with passion, but you must agree: in any case, the program applies the edges with maximum precision. The end result is that you are wearing a perfectly engraved piece of jewelry.
How a piece of jewelry is created: from sketch to final product
While looking at jewelry in the windows of jewelry stores, have you ever thought about the journey each piece takes before it ends up on sale? Today we are talking about the work of those who create jewelry - we will share the “kitchen” of the process and describe in turn all the stages associated with production: from a sketch on paper to direct implementation.
Moodboard collection and sketch creation
Work on a jewelry collection begins with choosing a current theme and source of inspiration. Before creating sketches, the designer usually draws up a moodboard - a visual representation of the mood of the collection. The mood board usually includes graphic images and photographs necessary to reflect the mood and theme of the future collection. Next is creating a sketch. On paper, the artist's idea takes on real contours. The designer develops several versions of one piece of jewelry at once, which may differ in design elements, inserts, clasp options and other details. Of all the presented versions of the product, one is selected - the best in terms of aesthetics and functionality.
3D modeling and master model
Based on the sketch proposed by the artist, a three-dimensional model of the product is built in a graphic editor (the most common tool in the jewelry environment is Rhinoceros). Thanks to the work of a 3D modeler, the artist’s two-dimensional sketches acquire volume and shape. Such a 3D modeling specialist has the competencies of not only a computer designer, but also a designer and technologist, which means that he takes into account the details and technological features of future products. Sometimes a 3D designer works directly in tandem with a production technologist, which allows a preliminary assessment of all the characteristics of the future product and amendments to the design before the decoration takes its final form. The 3D model must be designed in such a way that it is convenient for jewelry production to work with it. If the 3D model is made technically correctly, in the further production process there will be no difficulties with the product itself. At the same time, an incorrectly executed 3D model may turn out to be completely unsuitable in production conditions, or an order implemented using such a model may increase the cost of the product several times.
The model created in a graphic editor is printed on a 3D printer using a special polymer or wax. This soft-touch model is filled with liquid plaster and placed in the oven. At high temperatures, the plaster hardens, creating a cavity in the shape of the model, and the wax or polymer flows out through the hole left. Next, liquid metal (usually brass) is poured into this cavity, where it cools over time. This is how a master model of the product is obtained. The finished metal product is hand-finished to a standard for all future products. It is important to note that, for example, for each ring size or for each individual element of jewelry, its own master model is created. If, after receiving the master model, significant design flaws are discovered, at this stage the process returns to finalizing the 3D model.
Mold making
The next stage is the creation of a mold, which allows you to speed up and simplify the production process as much as possible, putting it on stream. The raw materials for molds are rubber compounds, so in a professional environment, molds are simply called “rubbers.” The finished master model is enclosed in this plastic mass, then placed in a vulcanization press and heated for 5 minutes, after which it is vulcanized for 40 minutes at high pressure and a temperature of about 140-150°C. At this time, the plasticine-like mass hardens to the state of rubber. After this, the carvers use special tools to carefully cut the mold and remove the master model, which has left a three-dimensional imprint in the rubber. Now the product can be produced in any volume. All products made using this elastic band will look the same. Simple products, without complex components, can be made with a single rubber band, while products with more complex designs usually require the use of several rubber molds (a separate rubber band is created for each part of the product). It is worth noting that rubber bands do not last forever, however, having a master model, you can always make a new mold. Making the mold completes the pre-production stages.
Waxes, “wax trees” and gypsum molding mass
At this stage of production, jewelry takes on a very real, albeit waxy form, which then becomes a kind of stencil for metal casting. The work on making wax models begins with a technical specification, which indicates the number of required products and the size range. Using special equipment (injector), molten wax is injected into the mold. In order for the wax to harden faster, the molds must be cold. Therefore, as the gums heat up, the waxer puts them in the freezer to cool. The finished stencils, along with the outfit, are submitted to the quality department for inspection. The waxes that have passed quality control are attached to the wax rod. The result is a wax tree - a blank for casting in metal, shaped like a Christmas tree. On wax trees, products are grouped by metal: one tree is made of silver, the second is made of gold, etc. Next, this entire wax structure is filled with plaster, after which it is sent to the oven to create a casting mold. At high temperatures, the wax flows out, and its remains burn out, forming a hollow plaster mold inside. This is the mold that will be used for casting. The main task of this stage is to obtain one plaster casting mold with maximum capacity in terms of the number of products.
Casting
Depending on the required metal, a jewelry foundry worker prepares an alloy for pouring by mixing pure metal (in the case of our jewelry, this is silver) with an alloy - a mixture of metals (usually copper, nickel, zinc, but there may be others). The components are melted together, thoroughly mixed to achieve uniformity of content and poured into a plaster mold prepared in advance. The mixture cools, the plaster mold is split, the remaining plaster is washed away with a stream of water and the finished Christmas tree in metal is taken out. Cast wax trees are disassembled into elements, the products are disconnected and sent for processing. The remaining rod with sprues (metal rods to which the products were attached) goes to remelting.
Tumbling and mounting
The next step is tumbling. The essence of this processing method is to polish products by mixing in a special drum with abrasive, where there are ceramic particles in the form of needles, balls, pyramids. After tumbling, the surface of the jewelry becomes smoother and denser.
The majority of products are finished by hand. Mounting, modifying and adjusting parts is a painstaking task that requires care. The strength of the future jewelry depends on the quality of the mounting in jewelry production. After this, the products are manually polished to a shine.
Testing of products
After tumbling and mounting, all jewelry is sent to the assay office. In the Assay Inspectorate, products are analyzed for compliance with the GOST standard. If the declared sample is confirmed, a special hallmark and production name are placed on the products. According to the law, a hallmark must be placed on all products made of precious metals. The only exception is made for silver: if the weight of a silver product is less than three grams, then the sample is set at will.
Electroplating and rhodium plating
Subsequently, those items that are designed with gold plating are plated with a thin layer of gold (we use 750 gold in our silver items) using an electric current and a galvanic bath. Silver products without gilding undergo rhodium plating using the same technology. This happens through an electrochemical reaction, in which particles of the applied metal are deposited on the metal of products immersed in a bath with a special solution.
Rhodium is one of the rarest metals of the platinum group. Due to its high strength, resistance to temperature, as well as to the influence of acids and other aggressive environments, rhodium is used as a protective coating for jewelry made of silver and white gold. In addition, rhodium is hypoallergenic and does not cause irritation or redness. Our silver products undergo a mandatory galvanic rhodium plating process, which protects the metal from natural tarnishing and scratches and imparts a beautiful shine. It is worth noting that galvanic gilding and rhodium plating do not in any way affect the hallmark of the product, which is why this stage follows hallmarking.
Setting stones
The final stage of production is the setting of stones, which are pre-selected for each piece of jewelry. There are two types of fastening - using glue or fastening with the metal itself. Regardless of the type chosen, at this stage the accuracy and precision of the work is especially important: the setter must install the stones in the grooves, attaching them so that they cannot fall out when worn. The organic origin of amber, the softness of the material, as well as the presence of inclusions and air bubbles make the process of working with the stone extremely labor-intensive. A setter working with amber must have exceptional knowledge of the physical properties of the stone in order to avoid chips and cracks.
Creating a complete and self-sufficient jewelry collection is a complex and multi-stage process in which all stages are closely interconnected. 3D modeling is considered especially important - it is this stage that directly determines how simple and fast the immediate implementation of an order in production will be. On average, the preparatory stages of production take about a month, and the direct implementation of the order at the factory takes the same amount.
Among all jewelry, the production of earrings is considered the most expensive. In fact, the retail price must include the cost of producing two products at once, so calculating the market value adequate to the costs is not an easy question. The creation of rings is also considered one of the most difficult, and not only from a production point of view (each size requires a separate master model and, accordingly, separate elastic bands), but also due to the calculation of further sales of products - when ordering, you must take into account the demand for one or another ring size.
It is worth noting that the process described above only applies to the creation of monolithic jewelry (rings, bracelets, pendants, earrings). Decoration elements such as chains, clasps and other types of accessories are purchased separately from jewelry production, as a rule, from other companies that specialize in weaving chains and creating connecting elements for them.
Of course, the production model described above is not the only one, but it is the one that is considered the most suitable on an industrial scale.
Rhodium plating
Rhodium plating is the application of a thin layer of the precious metal rhodium to a product. This procedure is necessary to give the jewelry hardness and a particularly bright white color. You remember that gold and silver are soft metals, right?
Rhodium is a durable metal with amazing reflectivity. It keeps its shine much longer than gold and silver, so it costs several times more.
Never confuse noble rhodium with the radioactive chemical element radium. Rhodium is a safe and very expensive metal!
Mokume Gane
Mokume Gane is an artistic technique that came to us from Japan in the 18th century. The technique involves giving the jewelry a woody structure. Professionals achieve this effect by layering precious metals and copper of different colors on top of each other. The result is a product that cannot be created from ordinary metal.
